Introduction
We participated in th PRS UK Rimfire match on May 10-11 at West Midlands Shooting Grounds outside Market Drayton. Our aim (no pun intended) was to get a feeling for the venue and also scout a little for the Swedish national team as preparation for the World Championships in August. It turned out to be a great weekend and we really look forward to returning. A big thank you to the organizers for lending us a bergara rifle in a MDT chassis with a Zeiss scope. We also want to extend a thank you to the other members of squad 4 for the good company and fun banter during the weekend.
The venue
West Midlands Shooting (https://wmsg.co.uk/our-ground) ground is well known in the clay pigeon shooting world and now we have come to know it as a really good place to shoot rimfire PRS. They have a gun room with a large selection of shotguns and a restaurant with about 100 seats. They have arranged many large competitions so I am sure they will be able to do a great job for the WC.
Getting there is easy, just follow the GPS. However the last kilometers are really narrow so it will be interresting to see how all the international drivers will manage going back and forth during the competition days.
The competition
Environment and general setup
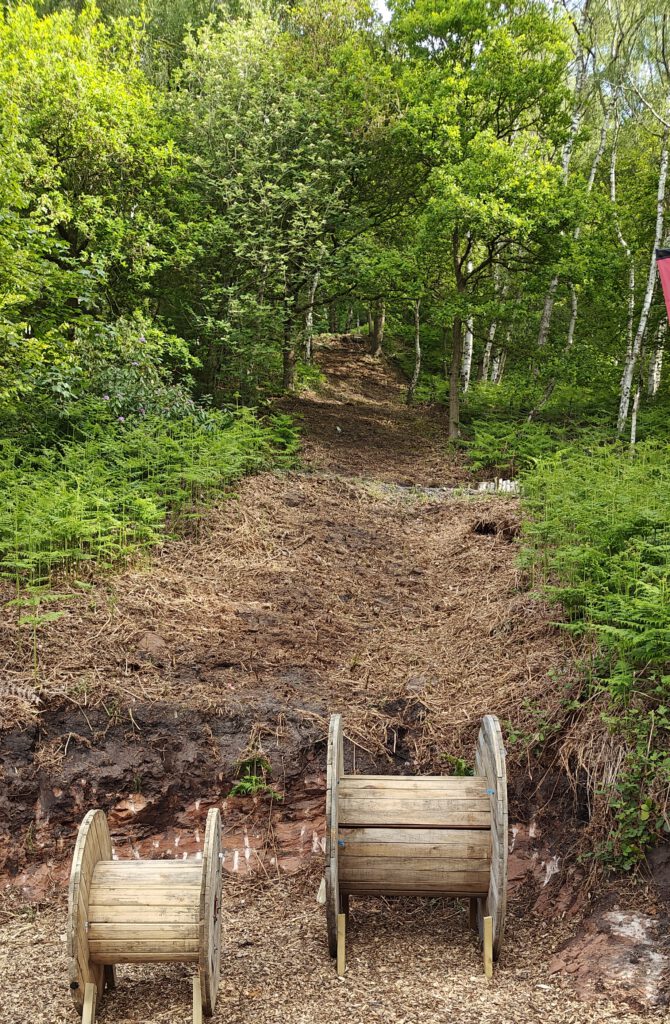
The stages were all set up against a ridge overgrown with beech- and birch trees. This meant that a majority of the targets were in an uphill angle, a lot of them between 15- and 25 degrees, so make sure you have a way of measuring the angles. All stages were within 4-500m of each other so logistics is easy. We were also provided with water, chips (crisps) and candy which is always very appreciated. The ROs were professional and friendly and we were also provided with a shuttle service for our equipment when moving from end stages.
One concerning thing that I hope will change for the WC is the attitude towards safety. I lost track of how many times I found myself with a muzzle pointed straight towards me. Since we were shooting upp a ridge it should be no problem to assign safe zones for the rifles.
Stage setup
A positive observation from the stage setup is that the difficulty level is managed by challenging your shooting skills, not by having unsafe wobbly props. You could basically shoot all stages with one bag, no need (or time) for tripod rear and there was really only one stage where you had any use of a bipod.
The stages were all realatively confined barricade/prop stages, no trail type stages like you see in Scandinavia. The targets were usually 0.6-1 mil depending on distance with the exception of the different KYL-racks (this is similar to the sizes from the WC in Italy 2023). Shooting was hit or miss only.
The difficulty was based on the following components
Time – All stages were timed at 90 seconds
Targets – 14 stages had 12 rounds, 2 had 10 rounds
Target acquisition – The targets were hidden by grass, trees and sometimes really hard to find in a hurry. The targets were not numbered in any way.
Positional changes – Most stages had 3-5 positions with as many as 8 on one.
Targets – Most stages had 2 or more target distances usually with a big-small target on each distance
Complexity – Many stages had a complex shooting order by distances and targets.
Angles – Since we were shooting mostly uphill whe vertical angles were up to 25 degrees. On many stages there were also horizontal angle changes up to roughly 90 degrees. Make sure you know how to compensate your dope for vertical angles.
Distances – The distances were between 45 and 285m with an average of 91m. The distances day 1 were generally longer than day 2.
Overall the composition of the stages was well balanced by the above components. The difficulty level was relatively high with no really simple stages. The most challenging steges were the window stage 14 (Woodworx did wood work) and the tanktrap stage 16 (Target, what target?)
Example stages
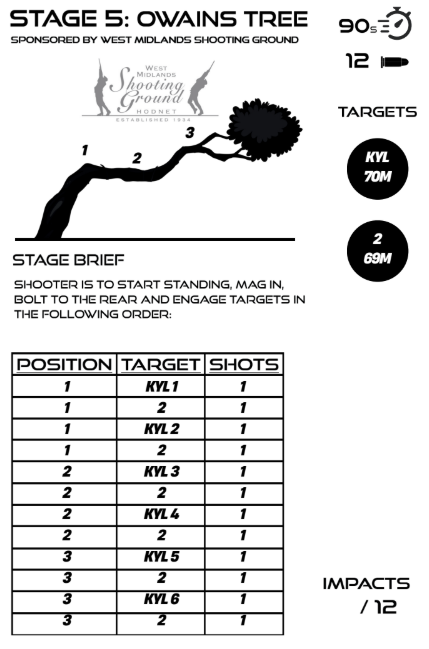
Stage 5 Owains tree
On this stage we shot 4 shots from each of the 3 positions on the tree for a total of 12 rounds. 6 shots were shot at a KYL-rack from big to small and 6 shots at a reference target 90 degrees to the right. Shooting order was one shot at the KYL, then a shot at the reference target, one shot at the next KYL target and so on. Target distances 69 and 70m so no need for holdover.
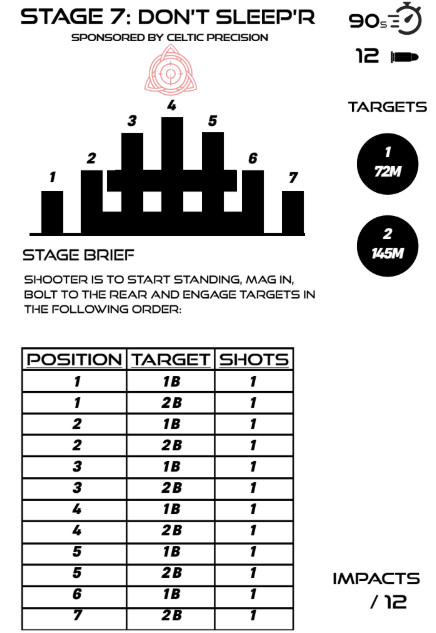
Stage 7 Don’t sleep’r
On this stage there were 7 positions and quite a big difference in target distance and angle as the near target (72m) was at ground level and the far (142m) up a hill. On the first five positions we alternated between near and far target and then one shot each on the last 2 positions. This large difference in distances and 90 seconds means you will need to compromise with hold over and parallax.
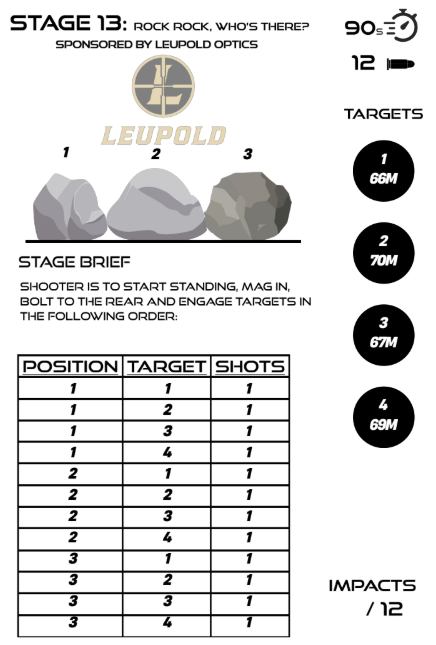
Stage 13, Rock, rock, who’s there?
On this stage there were only 3 positions but four targets. The targets were spread out over a steep hill with almost the same distance meaning that the drop differed only a single click or two. The shift horizontally and vertically was not too big. There were other targets in between the other targets so it was possible to shoot at the wrong one, apologies for the swearing in the clip.
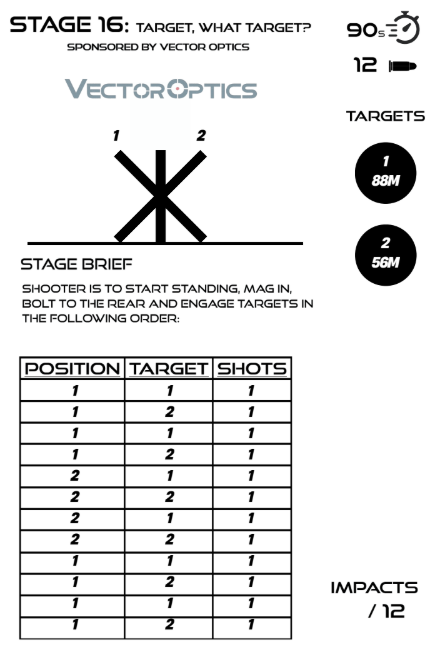
Stage 16 Target, what target?
The last stage of the competition was maybe the busiest one. Two targets, left up a steep hill (88m) and the right 56m) 90 degree shift sideways and not so far up a hill. Shots at alternating targets with 3 position changes left no time to dial and change parallax.